Tuesday, January 27, 2009

Feel the Wuv Coaster - Free Pattern (Intermediate)


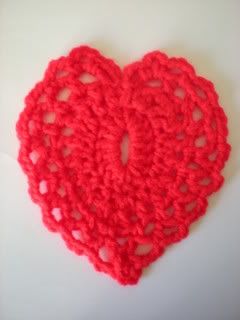
Materials & Finished size:
with small amount 4ply ww yarn and I hook - 4 1/2 x 5 1/2"
with small amount cotton and an F hook - 4 x 4 1/2"

Pattern Notes:
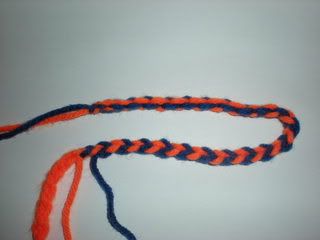
Refer to the pictures on page 2 if needed.


Instructions

ch 8, sl st in 1st ch to form ring
Round 1 - ch2 (counts as 1st dc) and 16 more dc in ring, sl st into top of ch2 to join (17 dc)

Row 2 - ch1, turn, (sc, ch2) in same dc, (hdc, ch1) in next 2 sts, (sc, ch1) in next 5 sts, (sc, ch1, twice) in next st, (sc, ch1) in next 5 sts, (hdc, ch1) in next 3 sts, do not join

Round 3 - turn, (sc, ch1) in next ch-sp, (hdc, ch1) in next ch-sp, (dc, ch1) in next 2 ch-sps, (hdc, ch1) in next 4ch-sps, (dc, ch1, twice) in next ch-sp, (hdc, ch1) in next 4 ch-sps, (dc, ch1) in next 2 ch sps, (hdc, ch1) in next sp, sc in last ch-sp, sl st into top of (sc,ch1), ch2, sc in sp between the top 2 dcs of the first Round, ch1, sl st into 1st ch1

Round 4 -Do NOT turn, ch4, hdc, in ch-sp, (ch3, hdc) in next 2 ch-sps, (ch3, sc) in next 5 ch-sps, for picot in bottom point - (ch4, sc in 3rd ch from hook, ch1), skip next 2 dcs, (sc, ch3) in next 5 ch-sps, (hdc, ch3) in next 2 ch-sps, (hdc, ch4) in sc, slst between the 2dcs of the 1st Round, ch3, sl st into base of the first ch-4 sp

Round 5 - Do NOT turn, ch3, (sc ch3 twice) in next ch-4 sp, (sc, ch3) in next 7 ch-3 sps, (sc, ch3 twice) in center of picot, (sc, ch3) in next 7 ch-3 sps, (sc, ch3, twice) in last ch sp, sl st into sl st, and sl st into the first ch coming out of the sl st to finish.

Tie off and weave in ends.


Tutorial Pictures


Copyright 2009 - All rights reserved.
Items made from pattern are not to be sold online.

You can download the pdf file of this pattern
@ my new Google Site:

ICD Free PDFs
~~~~~~~~~~~~~~~~~~~~~~~~~~~~~~~

Monday, January 26, 2009

Feel the Wuv - Valentine's Coaster

It's not love - it's WUV.
My newest free pattern!
As soon as it's tested I'll post it.
Valentine's Heart Coaster

It measures 4 1.2 x 5 1/2 inches
Made with Red Heart and an H hook.

~~~~~~~~~~~~~~~

Friday, January 23, 2009

Doily & Coaster at Dad's


He loved it - put it right to work under his lamp and uses his coasters for everything. It's a free pattern but I don't have the link offhand. It's not actually a very good - it is so full of mistakes that I don't want to finish the other one. ugh.

I can't right now anyways - my carpel tunnel's to the point that crocheting hurts. Thread is beyond what I can do right now. So - I'm making small projects instead.

I've been crocheting my fingers to the bone (or at least it feels that way), writing up a stubborn pattern for the Rose Basket. It's easy to just write it up shorthand but I want everyone to be able to make this and writing up a complicated pattern in simple to understand terms is new for me.

I can't post any pics of my most recent work since it's for Mom's birthday and she might look at my blog. Can't have that - so I need to wait a couple weeks. I do have lots of other neat stuff to share but I'm just too lazy to get up and takes pics right now.

I'm just getting over being REALLY sick. Strep/bronchitis - it's been awful. I feel better but I'm just so tired. I can't wait to get back into the swing of things again.

Tuesday, January 20, 2009

I'm on a roll - somebody stop me!


Once again - I just make what I see. It's a little bigger than my standard Scott roll but just right for my Dad's mega roll. Here's the link to the original patter.
http://www.irishlace.net/crochet/toiletpaperroll.html

Monday, January 19, 2009

Coffee Cup Toilet Paper Cover


This is just a pattern that I 'winged' after seeing the pic of the original coffee cup tp cover. I didn't even find her pattern again until after I made mine. After looking at her pattern on the blog I realized that we both used 48dc's.

Please understand that I'm not trying to infringe on her genious- it's just easier to store my tut here so I can find it again later. Besides, I like the top of hers better - she made the rim thicker.

She used homespun which is much thicker than RH. If I were to do this in black (like dear hubby just asked me to) I'm going to have to add in some extra sts so the white paper doesn't show thru.

Quick TUT

ch 55 and undo extra's later.
dc 1st row into back hump of ch for a finished edge

Round 1-10 - 48 dcs around (increase to 50 for a darker color)

Center - 4 rounds of circle starting with 12 dcs - attach as you go on round 11

Round 11 - flip circle so that the wrong side is facing up. As you st into Round 10 you'll - yo, insert hook thru the st and thru 1 loop of the circle edge, yo and complete your dc. Depending on your st counts you may not actually grab a stitch from the center for each and every dc around. Just wing it till it lines up evenly.

Handle - Rows 1 - 8 (leave long tails to attach) 5dc, sl st to join round. makes a tube.


Sunday, January 18, 2009

Rose & Water Lily TP Toppers

I actually did it. I still can't believe I did it! It's darski's fault! She made me do it! Well, no she really didn't but they're just so damn cute. My husband just does not understand. I guess he doesn't really need to but - check this out - told me I have to make one for his mom too. lolol

These are my patterns but I didn't write them down. Actually - I didn't type them down. I write in notebooks and hate when I have to type them up. Anyway - enjoy Kitsch!

Water Lily

(still looking for my googly eyes)


Rose in a Basket

I'm trying to get the purples, greens and beige to pull together in my main bath. Next time I'll only make one round of leaves - it just wasn't quite big enough. The basket weave needed extra space on the inside.


You can find these and great other stuff over at the
Kitsch and Kitch Can Cal
on the 'Ville.

Saturday, January 17, 2009

TUT for Crocheted Cord - chaining with 2 strands

This is an incredibly simple technique that you can get down in just a few minutes of practicing.

As you can see in this pic you can get 2 totally different looks simply by using 2 strands of one color instead of
2 strands of different colors.
The front looks like a knit st and the back is just way cool.

To begin -
take 2 strands of 4plyww and a G hook.

Step 1 -
Hold them together and make your first sl knot & ch1.

Now you'll alternate colors while
you chain st with only 1 strand at a time.

Step 2 -
yo and draw thru with orange


Step 3 -
yo and draw thru with blue


Step 4 -
Continue on until the cord is the desired length.


In the pic above you get a closer look at the difference between the front and the back of the cord.

Hook on!

~~~~~~~~~~~~~~~~~~~~~~~~~~~~~

Sunday, January 11, 2009

A Mini Flat Serafina


Macy's Super Cape
You can't tell what pattern it is with the vari yarn.
I don't like working with TLC Essentials Vari. It's very limp and splits something fierce. The solid is a nice yarn to work with. A little thinner than RH or Caron but still a nice yarn to work with.
I have a more pics to post after my Swap Partners get their presents.
~~~~~~~~~~~~~~~~~~~~~~

Thursday, January 8, 2009

Happy Holidays!


Merry Christmas
&
Happy New Year!

better late than never lol

Thursday, January 1, 2009

Hey everyone!

First I'd like to apologize for not keeping up on my blog here. It's been a while since I posted but as they say - Life got in the way.

I know I've been MIA at the 'Ville lately. 2 reasons for this.

1. My carpel tunnel has gotten to the point of surgery. I go to see the surgeon in a couple weeks and find out my options. I'm at the point - it's like - just do it already so I can have my hands back and get back to doing what I love.

My designing has been on hold while I can't use my hands. I've done a few things here and there but I just haven't had the ambition to do it whole heartedly since my hands cannot co-operate.

I do have a couple more free patterns going up if I ever get them off my note book and typed up. then they need to be tested but that'll be quick.

2. I started my very own Chronic Pain Support Group. I have many health problems and live in chronic pain. It sux but all you can do is your best with what life hands you. Getting my group set up took up a lot of my time for a couple months. It's finally at a point where it's almost running itself and I have WONDERFUL managers. Not to be rude but this is a PRIVATE group. It's also a very small group. I'm not recruiting for members here - just filling you in on what I've been up to.

I just checked my email and I have a few requests for extra help on my 24 point round ripple. I'll do my best to help you guys out with that. It even gives me a chance to check out my new camera that I got for Christmas.

and by the way:

Happy New Year!

~~~~~~~~~~~~~~~~~~~~~~~~~~~~~