by Michele Shirley
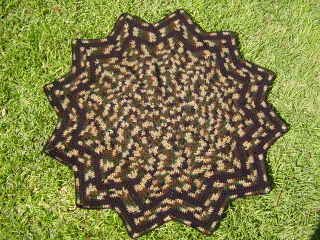
Instructions:
Round 1 – ch3, working over tail place 11 dc in first ch made, sl st to top of ch3 to join. Pull tail to close center.
Round 2 – ch2, turn, dc in same st as ch2, 2dc in each st around, sl st to top of ch2 to join.
Round 3 (For a solid center) – ch1, turn, Vst in next st, *dcdec over next 2 sts, ch2, dc in same st* 10 times, dcdec over next 2 sts, ch2, dc in same st, (to join the round - begin as you would a dcdec) yo, insert hook into next st, yo and draw thru st, yo and draw thru 2 loops, sl st into ch1 to join and draw thru all 3 loops.
Alternate Round 3 – (For a lacy center) ch4 (counts as 1st dc and ch2), turn, dc in same st. 1st
Vst made. Skip next st and Vst in every other st around.,
Round 4 –turn, sl st in next 2 sts, ch1, Beg shell in ch2 sp, shell in each ch2 sp around, sl st into ch1 of Beg shell to join.
Round 5 – sl st into next st, ch2, turn, *skip next 2dcs in center of the valley, dc in next st, shell in shell, dc in next dc* 11 times. Skip next 2dcs in center of the valley, dc in next st, shell in shell, sl st into top of ch2 to join.
Round 6 – turn, sl st into next st, ch2, dc in next st, Vst in shell, dc in next 2 sts, *skip next 2 dcs in center of the valley, dc in next 2 sts, Vst in shell, dc in next 2 sts* 11 times, sl st into top of ch2 to join
Round 7 – sl st into next st, ch2, turn, *skip next 2dcs in center of the valley, dc in next 2sts, shell in shell, dc in next 2sts*, 11 times, skip next 2dcs in center of the valley, dc in next 2sts, shell in shell, dc in next st, sl st into top of ch2 to join.
Rounds 8 – completion' Continue working in established pattern (Shell, Vst, Shell) increasing in the shell rounds only.
Make sure that your last round before the border is a shell round.
It gives it a much nicer finished edge.
It gives it a much nicer finished edge.
Border:
Notes – Remember to look at the center of your round ripple. Make sure that the right side is facing.
It really doesn’t matter if you turn your work or not for the sc border so long as the right side is facing.
Round 1 – ch1 turn, (or not) sc in each st, (2sc, ch2, 2sc) in each shell and a ch1 in each valley, sl st to 1st sc to join.
Round 2 – rev sc in each sc except in peaks and valleys.
- To work each Peak: – The shell is (2sc, ch2, 2sc) - rev sc in 1st sc, skip 2nd sc, 2rev sc in ch2 sp, skip 3rd sc, rev sc in 4th sc).
– To work each Valley: rev sc down the side towards the valley, skip the last sc, rev sc in the ch1 sp, continue placing a rev sc in each sc until you reach the shell in the Peak.
Copyright 2009 ICD
Items made from this pattern are NOT
to be sold on the internet.
Items made from this pattern are NOT
to be sold on the internet.
***********************


WONDERFUL PATTERN!! Thanks for sharing!!!
ReplyDeleteThank you sweetie!
ReplyDeleteJust to let everyone know - I will be writing the TUT for adding points.
How very pretty, big thanks for sharing your pattern
ReplyDeleteThis is AWESOME~*THANK YOU!* (((((HUGS))))) sandi
ReplyDeleteAwesome thanks for the pattern!
ReplyDeleteI just wanted to thank you for this pattern. I had tried 4 or 5 other ripple patterns and their methods always left a lot of bunches after 8 rows or so. This one works out perfectly. I don't know if it's your alternating rows of V-stitches and shells or if it's your method of joining and turning after each round. (Your join method leaves an almost invisible seam). But I'm 30 or so rows into what is going to be a large afghan and it's laying perfectly flat. Thank you so very much!
ReplyDelete